Widgets (product widgets) — tools for earning money
Widgets (product widgets) have become an inseparable part of websites. Product widgets are an affiliate tool that effectively supports sales via affiliate links.
Widgets (product widgets) — what are they?
In short, it’s a graphical information element. A widget can be, for example, the weather information we see every day on our smartphone screen, the date, or the time. Widgets visually inform us about the status of selected programs or applications on a computer or smartphone. Their graphic form varies—and importantly, we can usually change it and personalize it according to our own idea.
Product widgets in affiliate marketing — earning money by recommending products on a website
Product widgets, as an additional element on a website, have been very well adopted in affiliate marketing. Widgets are aesthetic ad creatives that present selected products in a tile-like layout, along with their photos, names, and prices, plus automatically assigned affiliate links to those products. These widget functions enable the affiliate system to track:
-
every click on a product inside the widget and the visit to the advertiser’s website
-
actions and sales that result from clicking the widget
-
commissions from those actions and sales credited to the publisher’s account
Product widgets are created by publishers using a widget generator after joining affiliate programs. Widgets can be horizontal or vertical and—most importantly—responsive. This means they automatically adjust their size to the devices on which they are displayed.
Product widgets can be visually matched to the look of your own website or blog—you can edit the background color, borders, and the appearance of the description or price. A single widget can showcase products from one advertiser or from multiple advertisers. They work perfectly on blogs and niche/topic-based websites.
Product widget — benefits of using widgets in affiliate programs
Product widgets have no expiration date
This means that once you publish widgets online, they will keep working for you until they are removed or changed. That’s why product widgets work brilliantly in so-called “evergreen content.”
Widgets always contain up-to-date product data
A widget is connected directly to an XML feed, so information about a given product is updated on an ongoing basis. If an advertiser changes the price of a product you selected for the widget, the change will be applied automatically in your widget. If a product is no longer available in the advertiser’s store, it will be removed from the widget. Thanks to this, what’s displayed is always current and available, which significantly increases the likelihood of conversion.
Creating widgets does not require knowledge of programming languages
Using widgets really comes down to copy + paste. You don’t need to worry about insufficient coding skills, because creating widgets in the webePartners panel is limited to choosing products, color scheme, or size, and then pasting a snippet of code into the appropriate place on your website.
A product widget generated in the webePartners.pl system
Product widgets in affiliate marketing — what are they used for?
The number of affiliate tools isn’t as broad as a deck of cards. Although we can place an affiliate link or a banner in various locations, it often happens that they don’t attract as much attention as we’d like. Widgets, on the other hand, have several important features:
-
they are visually appealing
-
they can be static or dynamic
-
they can be personalized
-
they are easy to integrate into your website
-
they are responsive
-
they are not intrusive
Widgets encourage users to click because their visual form is much more inviting and discreet than a traditional banner, making them an attractive and interesting alternative. Most importantly, they can easily be adapted to the design of your website. Products displayed in widgets have affiliate links attached, so every time someone clicks any product placed in a widget, they are taken to the advertiser’s store—and the publisher earns a commission if a sale occurs as a result.
Product widgets — where can they be used most effectively?
Widgets are most commonly used by bloggers, niche/topic websites, and product search engines. With widgets, you can showcase anywhere from a few to even dozens of products from different advertisers. It’s important that the products added to widgets are consistent with the content of the page where they are displayed. To insert a widget, you simply copy the generated widget code and place it in your website’s code. You can’t insert widgets into social media profiles (YouTube, Facebook, or Instagram), because you don’t have the ability to paste widget code there.
A product widget can contain products from one or multiple stores, and it can also be color-matched to the website.
Widgets have a major advantage over another graphic affiliate tool—banners. Banners are prepared by advertisers, and their visual layer may not suit every publisher—for example, due to colors that don’t match the website. A widget, however, is created by the publisher from start to finish, with full control over its appearance.Websites are often overloaded with banner creatives showing offers from different stores. With widgets, we can reduce them to a single area. The example below illustrates this best:
Kasia runs a fashion blog and displays banners from various affiliate programs offering dresses. Each graphic looks different, and they don’t match the look of the site. She decides to change her approach and generates a widget containing all the prettiest products (in her opinion). She adjusts its design so it looks good on her website. Thanks to this, she can get rid of a large number of banners and condense their content into one visually attractive graphic.
Kasia’s example shows how much of an advantage widgets have over traditional banners. Thanks to them, we can maintain the visual consistency of our blog or website. This way of presenting a store’s offer will also make users more willing to click.
Product widgets — how to earn money by recommending products
When generating a widget and adding products to it (even from different advertisers), we don’t need to worry about attaching affiliate links ourselves. The finished widget contains, in its script, links to all included products without needing to generate them separately. This way, we can be sure that after someone clicks any image and makes a purchase, the transaction will be credited to our account.
Aesthetically designed widgets will certainly encourage users to check out a specific product or store. Widgets are far more visually appealing than banners or ordinary affiliate links, and it may seem as if they are an integral part of the website. Just as importantly, we can freely modify them and adapt them to current trends or user requirements.
When generating a widget in your publisher account, the first step is to choose the products that will be displayed in the widget. It’s important that the products shown relate to the content of the page where the widget will be presented. This will positively affect conversion rates, because content readers will potentially be interested in exactly those products. But what matters most from the publisher’s perspective is the fact that when a user goes to the advertiser’s store, they do not have to buy the product they clicked in the widget. The publisher earns commission on any purchase that user makes in that store within at least 30 days—i.e., within the lifetime of the cookies.
Product widgets — how to generate them in webePartners step by step
If we want users of our website or blog to consider these tools truly useful, we should carefully select the contents of each widget. It definitely must not deviate thematically from the content we publish.
It’s good when the style of this tool blends properly with the aesthetics of our website. Fortunately, this is possible thanks to choosing the right color scheme. In return, the widget offers us effective use of space—and as we know, a viewer’s eye most often focuses on the first screen view, i.e., before they scroll down.
Given the simplicity of a widget’s structure, its versatility is truly worth noting. Many marketers and website quality specialists use them. Now you can use them too!
Creating a widget isn’t complicated, and it can help us generate higher sales of many of an advertiser’s products. Now we’ll focus on how to build one using our panel. After logging in, simply go to the Tools tab and choose Widgets >> Add a new widget.
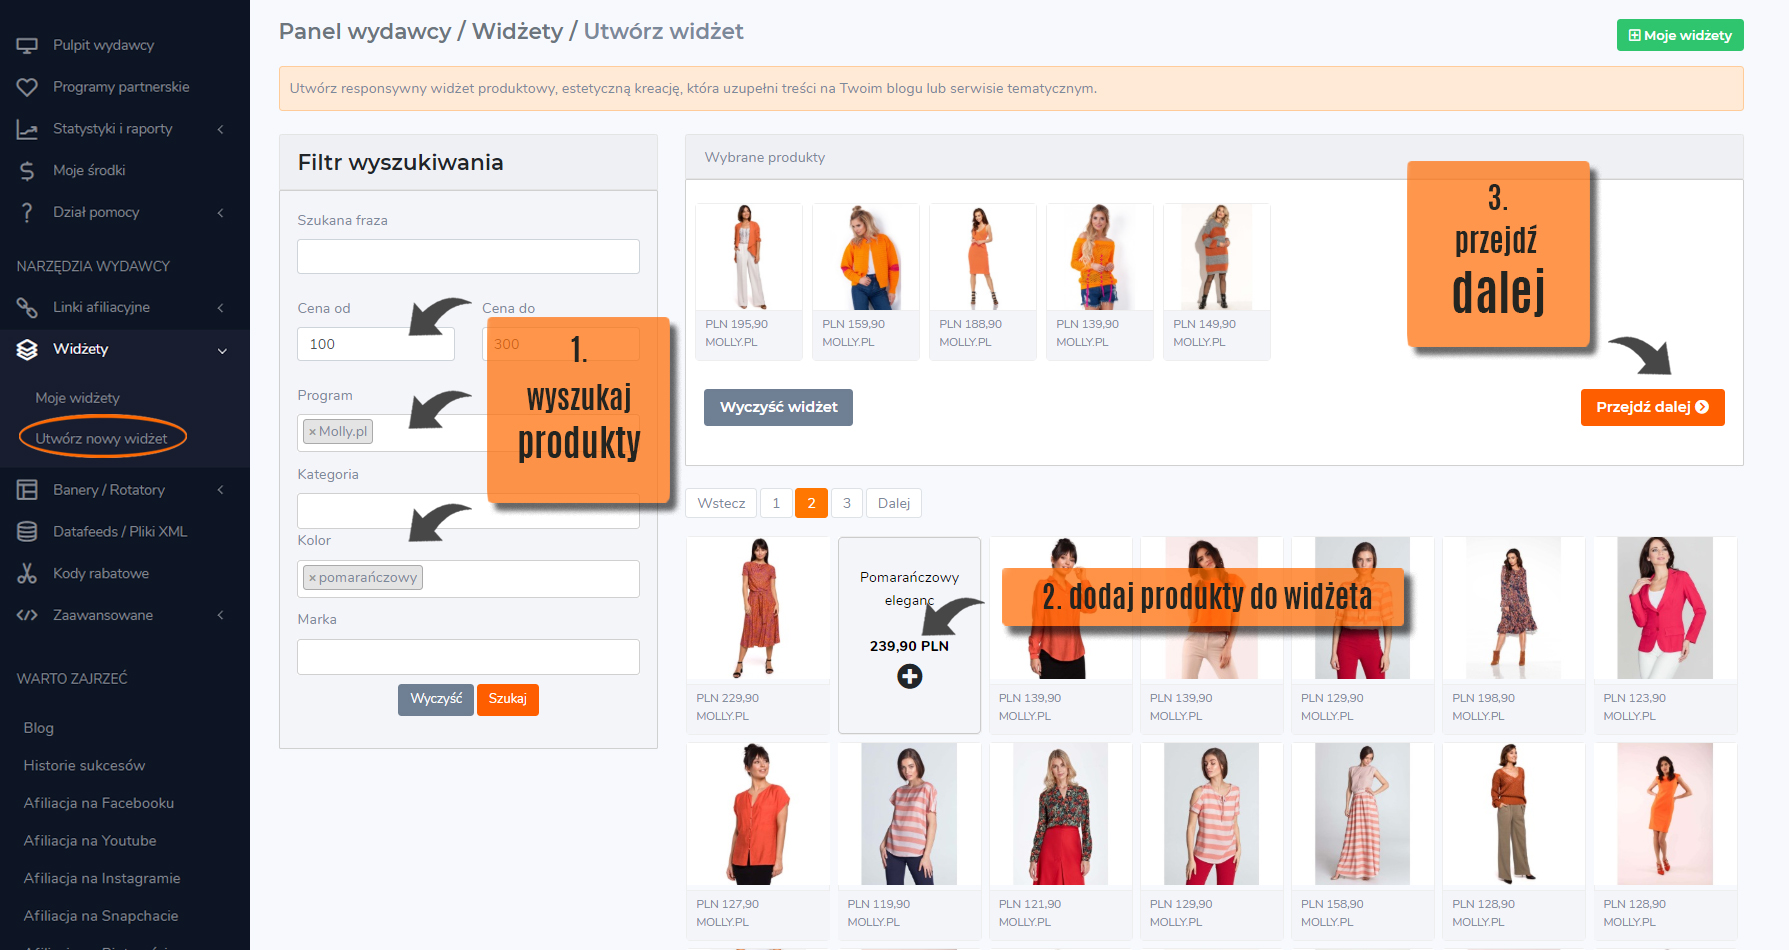
To narrow down the product search to the items you’re interested in, it’s best to use the search filters. You can specify:
-
Search phrase – enter the name of specific products, e.g., mug, book, suitcase, dress, etc.
-
Price range (from–to) – use this filter to choose a price range that suits you.
-
Program – select a specific affiliate program or several programs.
-
Category – you can also search by category, e.g., fashion or gadgets.
-
Color – it’s worth using this option if the widget is meant to include products with a similar color scheme.
-
Brand – there is also an option to search for products from a specific brand.
To add a product to a widget, simply hover over it with your cursor and click the plus sign. As a standard rule, to make it visually attractive, you should use at least 5 products.
Once you’ve selected the products that will be included in your set, click the Next button at the bottom of the page to customize its appearance.
Product widgets — customization
-
Orientation – you can choose between a vertical or horizontal widget; it depends on where on the page you want to place it.
-
Slider – an option where products in the widget scroll automatically. Remember to add at least 5 products here.
-
Static – in this case, products do not scroll. If you select more products, they will be displayed randomly each time the page is refreshed.
-
Tiles – products are displayed as tiles. If you choose a larger number, you can freely edit the layout/appearance.
-
Background / border / interior / text color – use these options to customize the widget’s color scheme.
-
Effects – you can choose from several different effects that make the widget more attractive; they animate individual tiles when you hover over them with the cursor.
-
Price / advertiser / description / link – here you choose which of this information should appear in the widget.
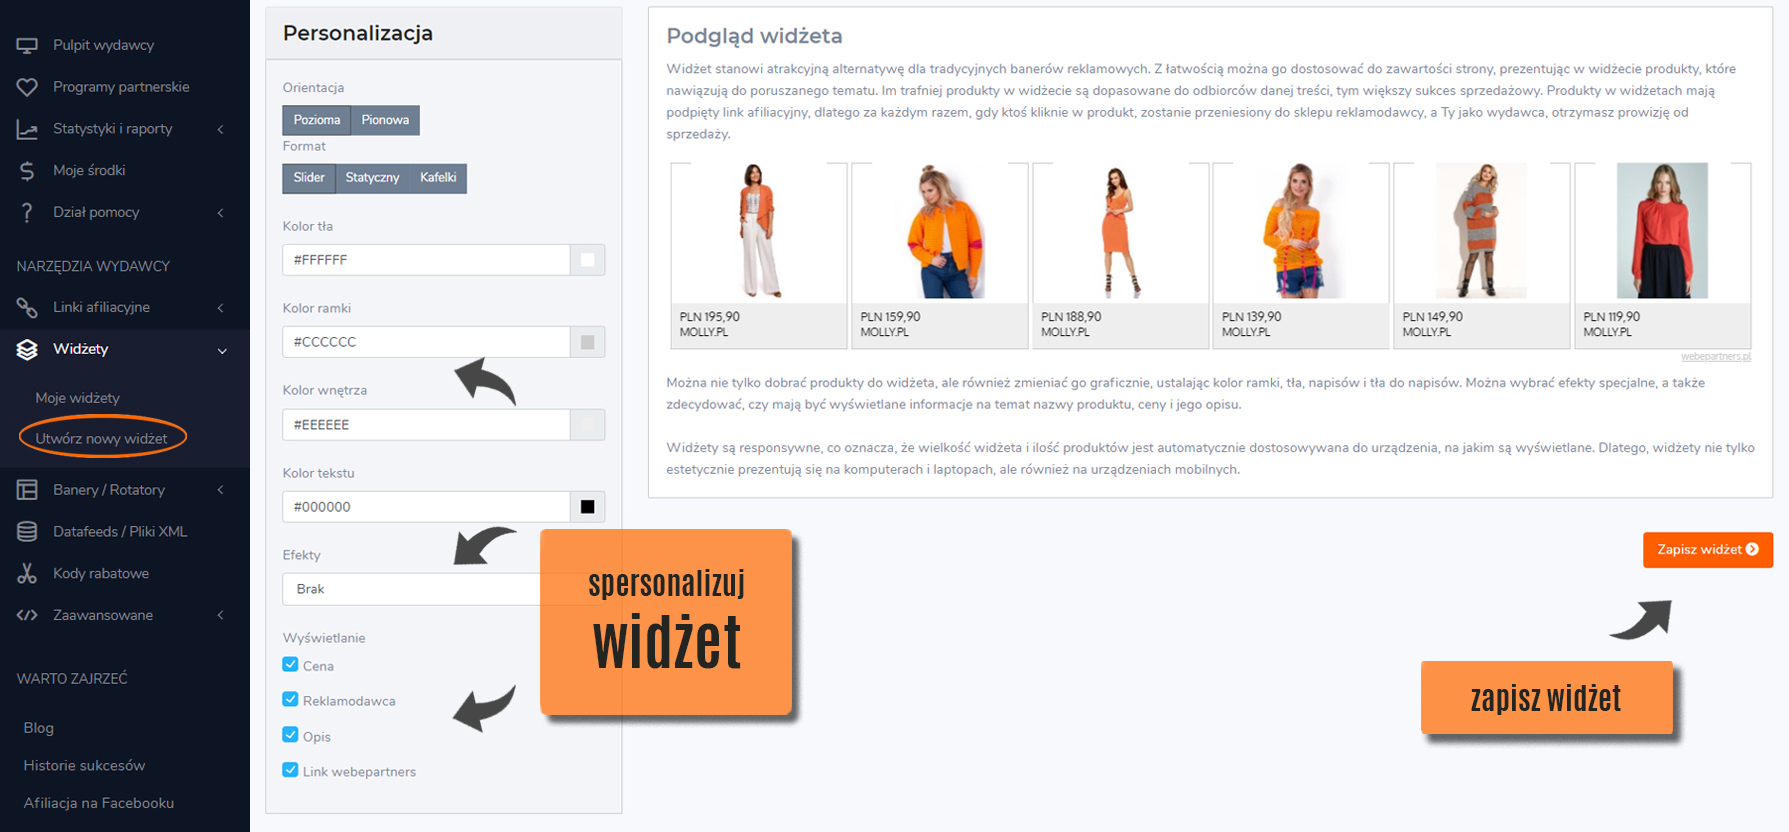
Of course, you can freely test every option so your widget looks as good as possible on your website. Once you’ve customized all the parameters, click Save widget. Next, you’ll be asked to name the widget, which will make it easier to locate later.
Product widgets — placing the code on your website
The final step is to download the unique code that you will then place on your website where the widget should appear. To find the widget code, click the My widgets tab.
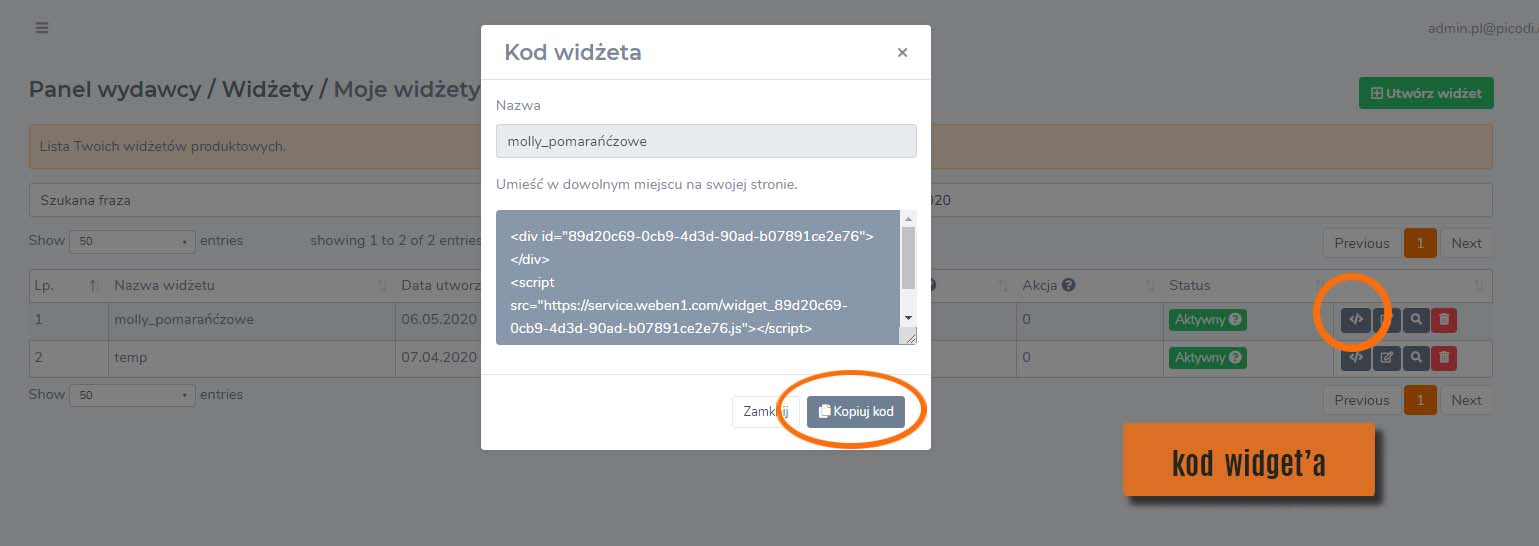
Select the widget you’re interested in and click the Download code button in the Action column. The widget code will then be displayed, and you can place it on your site. At any time, you can also edit your creative.
Product widgets in practice
Ready-made widgets will be displayed on your websites for as long as you need them. Remember that if a product disappears from the store’s XML feed, it will be automatically replaced in the widget with another one. Of course, you can modify your sets at any time—by adding or changing products or adjusting the style.

Widgets work perfectly on a blog or a niche/topic website and will certainly catch users’ attention! On our website, we use widgets to showcase products that can be found in the stores of advertisers cooperating with the webePartners network. Thanks to this, publishers can quickly get an overview of a given store’s offer and decide whether to cooperate.